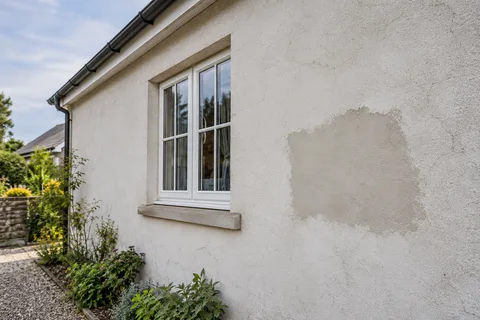
Wollaton exterior walls
Render respray in Wollaton | Recolouring a sound surface
A colour change can refresh sound render without replacing the entire finish. It still needs a suitable surface and a coating that belongs on it. Respraying is an application method, not proof that every existing render can be covered, and it should not be used to conceal loose material, unexplained cracks or persistent wet areas.

On this page
Start by deciding whether the surface can stay
Walk around the house and separate appearance concerns from defects. Fading, an unwanted colour and uneven soiling are not the same as a coating that is peeling or render that is coming away from the masonry. Mark the affected areas and ask for their condition to be assessed before a coating specification is chosen. A quotation should identify repair work rather than burying it inside a general promise to prepare the walls.
Find any records of the existing system. Product names, dates and previous decoration can help establish compatibility. If the surface has already been painted, the new work must account for that coating as well as the render beneath it. A sound-looking outer layer does not guarantee that all earlier layers are well bonded. The person specifying the work should explain what checks are needed and what would make a proposed coating unsuitable.
Where there are traditional lime finishes, seek appropriate advice before applying a modern paint or treatment. The whole build-up matters, including its intended moisture behaviour. A product described in broad terms as exterior or breathable is not automatically right for every older wall. The lime rendering guide explains the wider material questions; the exact coating choice needs to follow the actual substrate and technical guidance.
If the existing texture is the main objection, understand what the proposed treatment will change. A colour coat usually follows the surface beneath it. It should not be expected to remove a coarse texture or make uneven repairs disappear. Agree whether the aim is a new colour, a more consistent appearance or a different physical finish, because those can require different work.
- Clean Washed down, with algae and mould treated and left to work.
- Repair first Cracks and hollow patches are repaired before any coating.
- Prime or stabilise Where the coating maker requires it on that surface.
- Coating Usually two coats of a breathable masonry or silicone coating.
The usual order of work. The survey and the chosen products decide the actual steps.
Treat cleaning and repair as decisions of their own
The cleaning method should suit the existing material and the type of deposit. A discreet trial can show how the surface responds before a large area is treated. Avoid assuming that more pressure or a stronger chemical will produce a better result. Follow appropriate product and system advice, protect adjacent materials and make sure the cleaning does not damage the render or leave a residue incompatible with the next coat.
Persistent staining needs investigation before it is covered. Check whether water is repeatedly reaching the wall from a gutter, sill, coping or fitting. Surface growth near dense planting may also require attention to the conditions around the wall, but its appearance alone does not establish a diagnosis. Correct identified defects and allow the specified preparation and drying sequence before coating.
Repairs should be completed with compatible materials and allowed to reach the required condition. Their texture may still show through the new colour, so inspect them before the coating stage. If a patch is conspicuous, decide whether further finishing or a larger treatment area is needed. The render repair page explains how to document the extent and agree the visual limitation rather than discovering it after the entire elevation has been painted.
Ask for the quotation to name the cleaning, repair and coating stages separately. That makes it easier to compare proposals and to understand what has changed if the survey finds additional work.
| Check | Decision it supports |
|---|---|
| Existing system | Compatible coating and preparation |
| Adhesion and condition | Retain, repair or replace affected material |
| Cleaning trial | Method, residue removal and drying |
| Water defects | Corrections required before decoration |
| Sample colour | Accepted appearance beside retained materials |
Choose colour outside, beside the materials that remain
A render colour is seen with the whole house. Place samples near the roof, brickwork and frames rather than judging them against a blank indoor wall. Look at the front and rear if the light and surroundings differ. A shade that seems neutral on a card can appear warmer or cooler beside another material, and a broad elevation gives it much more visual weight.
Use the proposed coating on a representative sample where appropriate and label it with the product and colour reference. Allow the sample to reach the condition in which it should be judged. Keep a small number of candidates and record the final choice. If different elevations will receive different colours, show the boundaries clearly, including returns around corners and the treatment of recesses.
Consider retained items that may be affected by the new scheme. Downpipes, soffits, doors and boundary walls might remain unchanged, and the quotation should not imply that they are included unless they are named. A clear colour schedule prevents a rendering colour decision from expanding into an undefined whole-exterior decoration project.
Control application and keep a maintenance record
Spray application requires a protection plan suited to the site and conditions. Identify windows, vehicles, paving, planting and neighbouring property that could be affected. Ask how access and overspray will be managed and when conditions would prevent application. The contractor may use other application methods for some details; the specification should focus on the required result and the product instructions rather than treating one tool as the entire service.
Check edges and protected surfaces before the equipment is removed. Look around frames, vents, pipes and changes of material, and confirm that masking and temporary coverings have been taken away. Inspect the broad surface from normal viewing positions as well as close up. Record any remaining items and keep the accepted sample or its reference information.
Afterwards, follow the coating manufacturer’s maintenance advice and keep gutters and water-shedding details in order. Save the product name, colour, application date and any repairs carried out beneath it. A later contractor should be able to find out what is on the wall without guessing from a photograph. The Rendering Wollaton home page links the alternative finishes if the initial assessment shows that a colour coat is not the right scope for the existing surface.
Common questions
Will a colour coat make pebbledash smooth?
A coating generally follows the existing texture. If a smoother physical finish is the aim, that needs a different assessment and specification. Compare the outcomes explicitly: changing colour, retaining the texture, over-rendering where technically suitable, or removing the old finish. They are not equivalent descriptions of the same work.
Can only the front be recoloured?
A defined elevation can be considered if the existing system is suitable and the edges are agreed. Compare the proposed shade with retained side walls and returns. State which fittings and adjacent materials remain unchanged, and use a sample so the intended contrast is clear before the coating is applied.
See housing and planning information for Wollaton and nearby places, including the source and geography behind each figure.