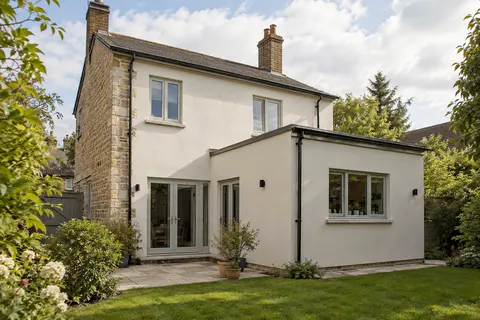
Wollaton exterior walls
External wall insulation in Wollaton | Plan the whole system
External wall insulation adds an insulating layer and an exterior finish to the outside of a building. It changes the wall’s dimensions as well as its appearance. The important early decisions are therefore about the complete assembly and its junctions: how it fits beneath the roof, around windows, beside neighbouring work and at the ground.

On this page
Establish what the existing wall can support
The assessment should identify the wall construction, condition and existing coatings before an insulation system is selected. Repairs, moisture-related concerns and weak surfaces need a defined response. Covering a defect with insulation does not remove the need to understand it. Ask which findings must be resolved before the design can proceed and which checks will be carried out during preparation.
Keep different wall types separate in the survey. An original house, a later cavity-wall extension and a lightweight addition may need different consideration, even if they currently share a painted finish. The designer should explain how the proposal deals with those transitions. Do not infer a wall’s construction from the age of the street or from a council-wide housing statistic. Where information is uncertain, record the uncertainty and the investigation required.
Traditional buildings need particular care because adding layers can affect both their appearance and moisture behaviour. Historic England’s guidance describes the practical challenges of external insulation on historic fabric. A suitable proposal needs to consider the building as a whole, not just a target thickness. If the property lies in a designated area or is listed, establish the relevant planning and building-control requirements with the responsible authorities before committing to the alteration.
For Wollaton, the Village, Park and Sutton Passeys conservation boundaries are distinct. Check the actual address rather than assuming that one neighbourhood name gives a uniform answer. Keep any advice or consent with the design documents so that later changes can be assessed against the same proposal.
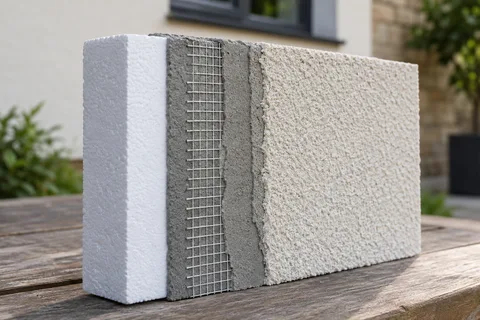
- Existing wall Prepared; fittings removed and the base track fixed above ground level.
- Insulation boards Bonded with adhesive and, in most systems, mechanically fixed to the wall.
- Basecoat with mesh Reinforcement mesh embedded across the board joints and around openings.
- Primer Where the system requires it.
- Finish render A thin-coat finish that weatherproofs the insulation.
Wall on the left, finish on the right. Not to scale: coats, thicknesses and primers follow the chosen manufacturer’s system and the condition of the wall.
Draw the new outside line of the building
Show the finished system depth on plans or clear detail sketches. This makes it possible to check whether sills, eaves and other projections still work. A roof edge that was adequate for the existing wall may need alteration when the outer face moves forward. Resolve that relationship before pricing the finish, because the render cannot compensate for an incomplete roofline detail.
Windows and doors need their own treatment. Ask how the reveals, heads and sills connect to the insulated areas and how the design addresses unavoidable changes in thickness. If windows are due for replacement, coordinate the decisions rather than allowing one project to constrain the other accidentally. Retain drawings showing the intended position of frames and the finished edge around them.
At ground level, identify the termination, adjacent paving and any changes planned by a landscaper. A later raised path can alter a carefully designed detail. Record the intended finished levels and make them available to everyone working on the exterior. The same applies to adjoining extensions, porches and boundary conditions: each junction needs a defined arrangement, not a gap left for another trade to solve.
The visible finish can be chosen within the appropriate system options, but it comes after these basic relationships. Silicone rendering may be used as a decorative part of some systems; its appearance does not describe the insulation, fixings or complete construction beneath it.
| Junction | What to coordinate |
|---|---|
| Roof and eaves | Projection, drainage and any required alterations |
| Windows and doors | Frame position, reveal treatment and sills |
| Ground | Termination and present or proposed external levels |
| Services | Penetrations, extensions and suitable fixing details |
| Adjoining construction | Continuity, movement and defined stopping points |
List every fitting and assign responsibility
Make an inventory of downpipes, lights, taps, cables, alarm equipment, vents and other items attached to the walls. Some need relocation or extension; others require a planned fixing through the system. Identify which trades are competent to carry out the work and when they need access. A render quotation should not imply that specialist service alterations are included unless they have been expressly allowed for.
Ask who is responsible for the design, supply, installation and inspection of the overall system. Where several parties are involved, clarify how changes are approved and how technical questions are resolved. Product substitutions should be checked within the specified assembly rather than accepted because a replacement board or mesh seems similar. Keep current drawings and material references available to the installation team.
An occupied house also needs an access and protection plan. Explain which doors, paths and parking areas must remain usable, and identify vulnerable planting or surfaces. The work may affect the exterior for longer than a simple colour change, so discuss storage, deliveries and temporary arrangements in advance. Include the householder’s everyday needs without allowing them to override safe working or the material requirements.
Inspect concealed stages and retain the system record
Agree inspection points before work begins. Relevant records may include the prepared background, fixing arrangements, insulation layout and the details around openings before the decorative layers cover them. The appropriate system designer or competent inspector should determine what needs checking. Photographs are useful records, but a collection of pictures is not a substitute for the necessary assessment and sign-off.
At completion, inspect the interfaces as well as the broad surface. Check refitted services, vents, rainwater fittings, lower terminations and roofline connections against the approved details. List unfinished items and keep responsibility clear. If the design changed during installation, retain the final version so future repairs are based on what was actually built.
Assess expected energy performance against the building, specification and use before comparing an insulation proposal with render-only work. Ask which assumptions the assessment uses and how the proposed system addresses them. Keep the system name, component information and maintenance guidance with the property records. The Wollaton rendering overview links the repair and whole-house pages if preparation or a wider refurbishment forms part of the same project.
Common questions
Is insulation included in an ordinary rendering quotation?
Only if the quotation expressly specifies an insulation system. A decorative render package and an insulated external-wall assembly have different scopes. The latter needs assessment and coordinated details for its added depth, fixings, openings and services. Compare complete specifications rather than assuming a similar finished appearance means the same construction.
Can outside lights be refitted after the work?
Plan their positions and suitable fixings before installation. The fixing needs to suit the background and complete insulation system, with competent trades handling electrical work. Keep the arrangement in the handover record so later replacements do not rely on an improvised fixing through the decorative surface alone.
See housing and planning information for Wollaton and nearby places, including the source and geography behind each figure.