Wollaton exterior walls
Silicone rendering in Wollaton | Texture, colour and details
A silicone finish is usually the visible final layer of a specified rendering system. Its colour and texture matter, but so do the base beneath it, the junctions around openings and the way the wall is prepared. When comparing proposals, ask for the full build-up rather than choosing from a colour chart alone.

On this page
Read the specification from the wall outwards
The existing wall determines the starting point. New masonry, old render and an insulated system do not necessarily need the same preparation or components. Ask the contractor to identify the background and show which parts of the proposed build-up address it. The product manufacturer’s instructions should govern compatible layers and application requirements. Mixing components because their names sound similar is not a substitute for a system specification.
A thin decorative finish should not be expected to straighten an uneven wall or secure loose material beneath it. Levelling, repairs and reinforcement belong in the earlier stages where the chosen system requires them. If a quotation describes only the final coat, ask what condition the wall must be in before that coat can be applied and who is responsible for achieving it. That distinction is especially important when one trade prepares the background and another applies the finish.
Existing paint or coating needs assessment for adhesion and compatibility. A surface that looks tidy from the driveway may still have weak areas or layers that cannot support the proposed build-up. The respray guide considers colour changes on retained render, while a full silicone system may involve a different scope. Compare the two as separate proposals rather than treating the product name as proof that removal or preparation is unnecessary.
- Sound background A background accepted by the specified system. Keeping old render requires a system-specific assessment of its bond and condition.
- Beads Corner, stop and base beads set the edges and straight lines.
- Basecoat with mesh Glass-fibre mesh embedded in the basecoat resists cracking.
- Primer Where the system requires it, tinted towards the finish colour.
- Silicone finish A thin, through-coloured, water-repellent coat that forms the texture.
Wall on the left, finish on the right. Not to scale: coats, thicknesses and primers follow the chosen manufacturer’s system and the condition of the wall.
Test the texture where the wall will be seen
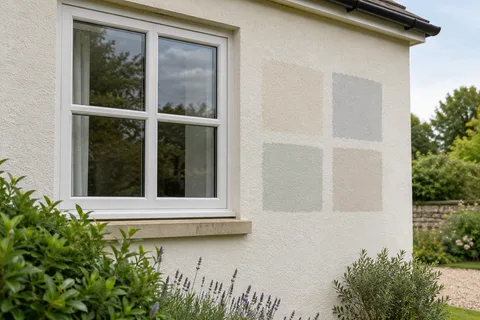
A grain size changes both the close-up texture and the way a broad elevation catches light. Ask to see a sample made with the specified material, colour and finishing method. A photograph on a screen is useful for narrowing a shortlist, but it cannot reliably show the surface beside your actual windows, brickwork and roof. Place the sample outdoors and allow it to reach the condition in which it should be judged.
View it from the pavement, the entrance and the rear garden if those are important viewpoints. A subtle texture can become more pronounced in low sun, and a pale colour may look different beside warm brick than beside a dark frame. Keep the comparison manageable: a few clearly labelled candidates are easier to assess than many tiny swatches. Record which sample was accepted, including the finish reference and the date, so the choice is not reduced to “the light grey one”.
Discuss how the work will be divided into practical areas. A broad uninterrupted face needs an application plan that suits the material and the available team. Corners, joints and other natural breaks help define those areas. Do not introduce arbitrary stopping lines solely because they are convenient on the day without understanding their visual effect. If a change of colour is intended, include its exact position on the elevation drawing.
| Record | Why it matters |
|---|---|
| System and finish name | Distinguishes the decorative coat from the whole build-up |
| Colour reference | Allows later material enquiries |
| Texture or grain | Influences appearance at different distances |
| Background and application | Makes the sample relevant to the proposed wall |
| Viewing conditions | Avoids choosing solely under indoor lighting |
Resolve the small edges before the large surface
Window reveals, sills and door heads often expose weaknesses in a vague specification. Show where the new finish ends against frames and how water will be directed away from the wall. A thicker build-up can leave an existing sill too short, even when the visible coating is thin. Measure the complete system depth, including any levelling or insulation, before deciding whether a replacement or extension is required.
At the base, preserve the intended relationship between the wall finish and adjacent ground or paving. Do not simply run the finish down until it meets whatever surface happens to be there. Ask for the lower termination detail and identify any future paving work that could alter it. Vents and service penetrations also need deliberate treatment so the finished wall does not obstruct their function or leave an unplanned route for water.
Rainwater pipes, lights and other fittings should be considered before application. Refixing a bracket through a new system can damage it if the fixing method has not been planned. List the items, who removes them and who reinstalls them. For external wall insulation, these penetrations need to suit the complete insulated assembly; the decorative finish cannot carry the responsibility on its own.
Plan application, cleaning and later repairs realistically
The chosen product’s temperature, moisture and weather requirements determine when it can be applied. Ask how the contractor will monitor conditions and protect the work while it cures. A sheltered-looking wall is not automatically ready, and a dry morning does not guarantee suitable conditions for the rest of the stage. The programme should include a sensible way to pause without leaving vulnerable edges or backgrounds exposed.
No exterior finish should be described as needing no attention. Keep gutters working, inspect joints and note persistent staining or damaged areas. Use the system supplier’s cleaning guidance rather than assuming a powerful pressure washer is harmless. Test any proposed treatment discreetly and avoid mixing cleaning products or methods without suitable advice. The aim is to remove unwanted surface material without damaging the texture or masking a defect.
If a repair becomes necessary, retain realistic expectations about matching an aged surface. Colour, grain and weathering can all affect the result. A small sample repair can help decide whether to patch, coat a larger defined area or take another approach. The render repair page explains how to establish the extent first. The Wollaton service overview also links to monocouche and lime so you can compare the specification and maintenance questions before choosing.
Common questions
Will silicone render cover uneven old patches?
The decorative coat should not be relied on to correct an uneven or weak background. Preparation and any levelling belong in the specified system. Inspect repaired areas before the final finish and use a sample where appearance is uncertain. The quotation should describe that preparation separately from the colour coat.
Can I clean it with a pressure washer?
Follow the system manufacturer’s cleaning advice and assess the condition first. An unsuitable pressure or method can damage the surface. A discreet trial is useful, with protection for adjacent materials and planting. Persistent staining should be investigated rather than repeatedly treated with stronger cleaning in the hope that it stays away.
See housing and planning information for Wollaton and nearby places, including the source and geography behind each figure.