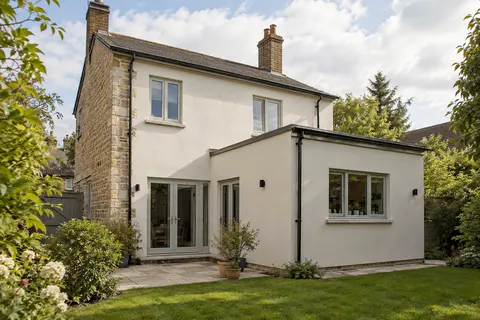
Wollaton exterior walls
A measured survey brief for a detached house in Wollaton
“Render the house” sounds like a clear instruction until two quotations arrive with different areas, different preparation and different assumptions about the windows. A short, measured brief can prevent much of that confusion. You do not need to design the system yourself. You need to describe the house and the result you want well enough that the people inspecting it are pricing the same project.

On this page
Give each elevation a name and a clear photograph
Start with four simple labels: front, rear, left side and right side, with left and right defined as viewed from the street. If the house has several additions, label those separately. A garage return or recessed entrance can otherwise vanish from a list based only on the main walls. Put the labels on a rough plan and use them consistently in photographs and notes. This prevents an instruction about “the side wall” from referring to different areas in different conversations.
Take a wide photograph of each face from a safe position. Include its roof edge and the ground beside it, not just the middle of the wall. Then add close views of openings, junctions and defects. A close-up of a crack without a wider location photograph is difficult to interpret later. Avoid climbing or leaning into unsafe positions to obtain an image; inaccessible areas can be identified for inspection from suitable equipment.
Approximate dimensions can help establish the scale, provided they are labelled as preliminary and checked by the contractor. Record the overall height and width where practical, plus obvious openings and projecting features. Do not present a rough household measurement as a finished bill of quantities. Its value is in making omissions visible, such as a narrow strip behind a porch or a gable above a flat-roof extension.
For a detached house, include all the faces even if only two are currently in scope. The retained elevations help explain the intended edges and colour relationships. The house rendering guide describes how those separate records become one coordinated specification. Keeping the whole building visible also makes it easier to compare a limited project with a later phase without starting the survey record again.
Mark what changes and what stays exactly as it is
Use a copy of each photograph to mark the proposed rendered area. A simple shaded outline is enough. Then identify materials and features that remain exposed: brick panels, stone surrounds, timber, a plinth or decorative detailing. Do not assume the contractor knows which features you value. A feature that looks like an awkward interruption to one person may be the main reason another person likes the house.
Now mark the uncertain areas. Perhaps the existing pebbledash might stay on the rear wall, or the finish beneath a bay window needs investigation. Write the question beside the area rather than shading it as if the decision were made. This gives the survey a purpose and keeps provisional work separate from the agreed scope. It also helps explain why a quotation includes an allowance rather than a fixed description for that part.
Consider the depth of the proposed work. If a new build-up changes the wall face, sills, vents and eaves may need attention. The brief does not have to solve those details, but it should flag them for the designer or contractor. A photograph taken obliquely along the wall can show projections more clearly than a flat front view. Include planned window replacement or roof work so the rendering is not designed around components that are about to disappear.
Where only one elevation will change, define the return at each end. The individual-wall guide explains why a natural corner or deliberate stop can be preferable to a vague instruction to blend new render into old. The measured brief should show the intended visual boundary even when the final technical detail still needs development.

| Heading | Information to include |
|---|---|
| Identification | Elevation label and dated overview photograph |
| Extent | Approximate dimensions and highlighted work area |
| Retained features | Materials, details and fittings that stay |
| Condition | Visible defects and areas needing closer inspection |
| Interfaces | Roof, windows, ground and adjoining construction |
| Open questions | Decisions to resolve before a final quotation |
Add the site information that a wall photograph misses
Describe how someone reaches each elevation with materials and equipment. Measure a narrow passage if it is relevant, and identify steps, gates or turns. A side wall can be physically close to the road yet awkward to access through a garden. Include conservatories, lightweight roofs and other surfaces that cannot simply be treated as a convenient working platform. The access contractor needs accurate information, not an optimistic assumption based on an aerial view.
List the routes the household needs to keep using. Front and rear doors, bin access and deliveries can conflict with storage or scaffold positions. Explain any mobility requirements or other practical constraints at the outset. The aim is to design a workable arrangement, rather than asking the installer to move equipment repeatedly once the project is under way. Where access involves neighbouring land, identify that dependency without assuming permission has already been given.
Planting deserves a separate line in the brief. Mark established shrubs, climbers and trees near the walls, and note anything you are willing to move or cut back. Protection is easier to plan when the plants are visible in the survey information. A garden should not be treated as an empty staging area just because its surface is softer than the drive. Our article on working beside mature planting develops this part of the preparation.
Finally, include a list of wall-mounted fittings and any known plans to replace them. A new outside light, moved tap or altered downpipe can affect the finish. Assigning those decisions early reduces the likelihood of drilling through fresh work immediately after completion. The brief should describe the intended end state of the exterior, not merely the condition found on the first visit.
Example: two proposals for the same detached house
Consider an illustrative project with a tired front, a sound rear elevation and a new side extension. One proposal includes all three areas; another prices only the front and extension. The totals cannot be meaningfully compared until that difference is understood. A marked elevation sheet makes the mismatch obvious without requiring the householder to decipher a contractor’s internal measurements.
The same example can expose an access assumption. If one proposal includes equipment over a low rear roof and the other never reaches the rear wall, the difference is about scope as well as price. Keep the access requirement attached to the relevant elevation. Then decide whether the rear belongs in the project now, later or not at all.
Once the extent is agreed, compare preparation and finish on that common basis. This is more useful than asking both contractors to reduce their totals while leaving their descriptions unchanged. The brief does not choose the contractor; it makes the alternatives understandable enough for a fair decision.
Use the brief to compare proposals and manage changes
Send the same version to everyone pricing the work and keep a date or revision number on it. If a survey changes the scope, update the affected elevation and circulate the correction. This prevents one contractor pricing an old assumption while another includes the revised work. A brief that changes through scattered messages soon loses the benefit of having been written down.
Ask each proposal to identify its assumptions and exclusions against the brief. One may allow for removal of all old render; another may retain sound areas. Neither should be judged on the total alone until the different outcomes are understood. Use the cost guide to separate preparation, access, detailing and finish. Compare offers on the same scope before judging their totals. For example, state whether removing and refitting rainwater pipes is included, who provides replacement fittings and whether the quote includes making good around their fixings.
Keep photographs and notes from any opening-up trials with the relevant elevation sheet. If the background differs from the original assumption, record the proposed response and approval before it is covered. This is useful evidence of what was agreed, not paperwork for its own sake. It gives both householder and contractor a common reference when a later question arises.
At handover, use the same sheets to check the completed extent, retained details and reinstated fittings. Add the final system and colour references and file the record with the property documents. The Rendering Wollaton homepage links the finish guides and local evidence if the survey raises questions about material choice or a conservation boundary. The result should be a brief that someone unfamiliar with the original conversation can understand.
See housing and planning information for Wollaton and nearby places, including the source and geography behind each figure.